|
 |
 |
|
|
|
|
|
|
|
|
|
|
|
|
Injection Projects
Large cavities (over 4”) may be susceptible to some dimensional change when closed-cell foam is used.
We assume that there will be adequate fasteners or bracing for injected wall and roof cavities.
For new injection work, a vapor retarder should be installed behind new Sheetrock, or other interior sheathing, to serve as a release and protect wood framing from moisture (This will also increase the aged R-value of injected foam insulation). We recommend the use of poly on spray-applied areas in spaces that may have elevated humidity levels. This provides inexpensive protection against moisture migration into framing, especially where multiple-ganged framing members cannot be sealed by the foam insulation.
Drilling the holes
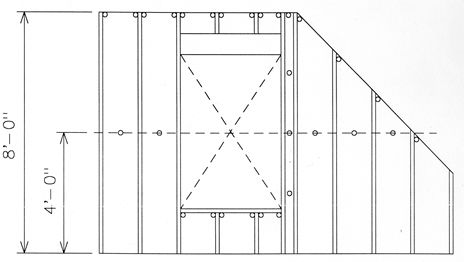
This diagram shows the proper locations for drilling holes in preparation for an injection work.
Standard bay: One hole in the center of the bay four feet up from the floor. Two additional holes at the top inside corners of the bay. Foam is first injected through the lower holes. The injection work is then completed through the top of the bay.
Jack stud bays: Because of the minimal height of these bays, only two holes at the top inside corners are necessary.
Narrow bays: Bays next to widows and doors that are narrower then the standard bays may need more holes drilled. The bay will fill faster requiring access holes to properly fill the cavity.
Gable end bays: These bays still require a hole in the center of the bay that is four feet up from the floor. The top of the bay only requires one hole at the top of the slope made by the roof.